Showing posts with label Electrical. Show all posts

Wednesday, June 26, 2019

Back in South Dakota for the summer

I'm way late posting... again. Less bad than usual though. Due to storms that were passing through the Kansas City area, where I was about 6 weeks ago I hurried on up towards my destination in South Dakota. A little over a month ago, I got here. I'm going to be in this very cheap RV park until at least late July, if I don't stay until late August even.

In Harrisonville, MO, I had to stop and replace the completely worn out rear shocks. They are super easy and there is enough ground clearance, I just shimmied under and changed them in the Wal-Mart parking lot where I picked them up from site-to-store pickup. It only took a few wrenches and some WD40 to do. The old ones were probably the originals from 1985. They were doing nothing anymore. The new shocks have made a big difference, that's for sure.


A few weeks ago, I had to clean the nasty, dust-caked roof A/C evaporator. It was freezing up after being on a while, totally stopping airflow. It was like a wet blanket of dust. You can see the clean part of the coils at the top where it was blocked by the metal cover. Yes, it was THAT thick. It has been working great since. 


While I was at it, I bought some 3-in-1 multipurpose PTFE lubricant and oiled up the blower motor too, since it has little hoses for doing so. It certainly can't hurt to have some fresh lubrication on a 34 year old electric motor. This upcoming weekend's temperatures are going to be near 100, so I need the A/C in as best working condition is possible.


Today, I changed out the old, original battery solenoid that seemed to be dead. I snagged a NOS Napa ST84 on eBay for $12.75 shipped as a replacement. They are over $40 retail! Now the house batteries can get juice from the alternator again while the engine is running.


Not much else to report. Lucy has been her usual silly, cuddly self. As I write his, she is basking in the sun just outside.


Sunday, June 24, 2018

Ice isn't nice

While in Missouri, I bought a bigger generator (1400W/2000W peak) and a 2 door mini fridge, rather than constantly buying ice. At the time, I only had one battery so it didn't do so well overnight. I also had to buy a bigger inverter for the fridge. I got one from eBay, since I had General Delivery mail access at the time. Well, I ended up returning the fridge. I bought a second battery instead, in case I got a cheap fridge again later on.

Well, I did. A few days ago, I got an old Sears Coldspot fridge for free. Well, actually it cost about $12 in fuel to go get it, but yeah. It pulls more amps than modern fridges but it works nicely. A new $60-80 1.7 cu ft fridge would pull less power, so I might bite the bullet later on and get one. For now, I'm honestly trying to minimize costs at this very moment.

Unfortunately, my generator, batteries and charging setup can't keep up, even with 100W solar panel tossing in a few amps here and there between the clouds. My 90s Yamaha EF600 generator is on my 500W/600W peak, so it can't start the fridge. It has a built in 10A charger, but the fridge just consumes that. I need a way to power the fridge separately from the battery bank while the batteries recharge, so I'm debating ordering that same generator again while it's still cheap.

I might have to try to sell the Yamaha generator, even though I'd rather not. It's a great little generator. But, it's just too small for my power needs. I'd REALLY like to have the Harbor Freight 1600W/2000W peak inverter generator ($450+tax with coupon) but, I can't justify spending that kind of money right now. The cheap generator is about $160 with tax. Quite a difference in price.

In the meantime, for free power, I bought a $19, 14 gauge, 100ft extension cord (10A max) so I can use an outdoor outlet at this park. I figured it was a good investment right now and for the future, anytime I see an outlet in a park that's far from the parking lot.

The reason for the big push for a fridge? I spent probably $50 on ice just this month. It has been warm mostly, so 20lbs of ice at $4 to $5.50 lasts me all of 3-4 days. When it's 82 out, it gets up to 90+ in here, without shade.

The fridge being off the battery bank has helped a lot in just a little over an hour, so yeah. I need that bigger generator I guess, as much as I hate to spend the money. I hated spending on ice just as much. Yeah it'll cost more in gas than the Yamaha and makes more noise. (The noise travels much further) I've considered a second solar panel, which costs only a small amount more, but on a cloudy day like today, I'd be in the same boat: not enough power.

I'm debating just hanging around this city for all or most of next month. It seems vry doable based on what I have observed of other local RVs hanging around. That would actually allow me to buy the generator, rather than spending on fuel to drive 500+ miles. Plus I have access to that power outlet. Using it a few hours a day would probably be all I need. After 2 hours, my batteries are looking good. Yeah, I'm supposed to be in this for traveling, but at the same time, I can't disregard mundane, day to day existence. So we will see.

Wednesday, December 28, 2016

Lazy (and boring) days

I still have been slacking off blogging, but I have a pretty good excuse, the cell data here stinks. I'm amazed Blogger's site loaded. The app is bugged and crashes, so I must use the site. (It has taken over an hour to do this post!!)

Anyhoo...

A couple days after my last post, I have started getting (overly) obsessed with the idea of getting a tiny old travel trailer. This stems from one being here for sale, but that I missed out on.


Something that small can be towed with my car.

However, my car needs rear struts badly first. It looks like it's heavily weighed down when it's not. Rather than pay $650 including labor (dealer quote), I'm going to wait until I get to Arkansas, where I can do the work myself for the $160 in parts. So for now, a trailer will have to wait for sure.

I enjoyed a bunch of Xmas episodes of MST3k and Rifftrax on Xmas Eve.


On Xmas day, I did more camp stove shopping. I have too many now, ha!


The next morning, I made (awful) pancakes. The mix is what's awful. I'll be throwing out the rest, I'm sure. Maybe if I had butter, not butter flavored canola oil spray, they would have been better.


Generally, it has started to get bloody boring here. Part of my boredom is not having much to do. I'm as socially avoidant as ever. I did find the dog park so I go there almost everyday.

Yesterday, I bought a nice little, older Yamaha EF600 generator. I did a short trial run with it this morning and it does just what it should.


Maybe I'll kill boredom easier now, even if it's just offline PC gaming.


I still have too many clothes, so... more need to go!


And finally for now, Lucy basking in the warm sunshine.


Monday, December 5, 2016

Heading out on Friday!

It's almost time, already. November went by a lot faster than I thought it would. But, I've almost got my apartment emptied out and my storage unit is 99% full. One more small load will finish it off. Then I have to scrub pretty much everything in the apartment so I can get my deposit back.

I think I am going to rejoin Anytime Fitness for shower access. Last time I used it quite a bit. Just twice a week even is enough to pay for it, so yeah. I am going to check into what the local club charges since they won't think twice about letting me join since I have an ID and address here currently. Trying to join anywhere else would be harder since they want you to mostly use THEIR club. Otherwise I could find a location with cheap prices and join there and then never go back. Which is actually what I want to do with the one here basically, but yeah.

I have put a new Optima Yellowtop D35 battery in my car since the old battery was 5 years old and was noticeably starting the engine slowly on cold mornings. So now I have a starting/deep cycle hybrid battery for charging my phone/tablet with the engine off. I have also installed USB charging ports (1.0A & 2.1A), a 12V port and a digital voltage meter in the rear of the car, wired directly to the battery so I don't have to turn the key to use them, unlike the factory 12V outlets located in the front of the car. I also put a switch for each function so it they don't power when not in use.


Sunday, January 12, 2014

Alternator replaced

I found my battery was dead this morning when I went to leave Wal-Mart. (Oh, and I stayed parked under a "no overnight RV parking sign" for 2 nights without even noticing it.. but luckily no one bothered me). I managed to get it to charge enough via slight solar charging to get it running. I went over to O'Reilly auto and had them charge the battery then test the charging system with their hand hand portable testing device.

Do NOT always trust those devices! They can be mistaken!

(Before that, I had tried a diagnostic method of my own from the Haynes manual involving bypassing the voltage regulator to see if the alternator would output high volts without the regulator present.. and it didn't. That's a sign of a bad alternator. But I wasn't 100% sure.)

The tester said that it was a problem with my voltage regulator's diodes or some such. Being a $20 part, I figured it might be the problem since the diagnostic said it was.. plus it's a lot easier to change out than the alternator.

However, before I paid for it, I asked the guy if I would be able to return it promptly if it doesn't fix the problem. He hesitated a bit... then said he would do that for me as a warranty exchange.  So I install it.. no dice. He tried again testing the system with the handheld tester (they test at the battery) and it said the same problem, bad voltage regulator and that the alternator was fine. He was scratching his head at that point.

So I removed the new voltage regulator, replaced the old and had him check for a new (rebuilt) alternator. He only had the 1yr warranty one in stock. It would be Monday before they could have anything else. Rather than limp for 2 days more on a bad alternator, I decided to nip it in the bud now.

So, I set out removing the old alternator. They have a BETTER test machine inside the store that cannot be moved, and requires the part to be out of the vehicle. After removal but prior to purchase of the replacement, I had him test the old one. It came up FAILED on that better machine.

So, I went ahead and did the return on the voltage regulator and bought the new alternator. I got it put on and all is well now.

If you are in Benson, AZ and need auto parts, I recommend O'Reilly Auto for sure. They were most helpful and patient. They also lent me a hammer to pound in the roll pin for mounting on the new one where it wasn't put in all the way like it was supposed to be.

A tip to someone who may be doing this: Remove the air cleaner housing and get the alternator out via the area on the right side. Your transmission dipstick tube might be in the way a little and the oil filler cap on the valve cover may be slightly in the way, but I didn't have to remove the cap. It's a tight fit but I got the old out and the new in that way.

Also, double check your belts!! I had them on wrong around the crankshaft at first. I double checked due to one being tight and one being floppy. One was outside of the grove, one was in the wrong groove and the other grove was empty. Thankfully it didn't hurt the belts as it was only run for a minute or less that way. It only took a couple minutes to loosen the alternator again, fix the belts back on the pulley right then tighten back the alternator.

The "new" alternator:

Sunday, October 20, 2013

Battery cables replaced

A week and a half ago, I found that I needed to replace my negative battery cable as it was giving 'dead battery' symptoms on my brand new battery. It turned out to be god awful shape down below where I couldn't see.

Today I ended up replacing the positive cable too since the repair terminal decided to break when I was putting the battery back in, after adjusting the steering gear box (which will hopefully fix the loose steering problem I have still had).


The positive cable was in a LOT better shape than the negative for sure. Negative had major cracks and holes in the insulation.


I'm not to happy with the new black insulation 'positive' cable that AutoZone had, but that's all I could find in this small town (Brownfield, TX). At least it came with labels so you could mark which cable it was. I had to do some minor wiring for the extra cables that feed from the hot terminal. The splice is soldered, taped over and has heat shrink tubing over it.

Now I should be good to go for a long time on battery cables.

Wednesday, September 4, 2013

Solar panels - Part 2

I just realized, I never did get around to showing the rest of my solar panel installation!

Here is a photo showing the cable coming in from the panels, going to the cheapy MPPT charge controller from China on ebay and the cable running out, down to the battery bank.

Both solar panels have in-line fuses outside in weatherproof holders and the controller has a fuse between it and the batteries, so it's all well protected. It's almost all 8 gauge wire, except the ends at the charge controller, the solar panel connectors and the fuse holders. Those are all 10 gauge but such short length, they can carry plenty of amps like the 8 gauge, should I add more panels later. 10 gauge might have been all I needed, but it's better to oversize the wiring in case of expansion, rather than having to rip it all out and redo it later.

I have a 3 outlet strip plugged in to a 12v outlet up front I added. I'm not using the power output hookups of the charge controller but some people might wish to, if they do this kind of setup.


Rear 12v outlets

I finally got around to putting in 12v outlets in the bed area like I have been wanting to for months.

I picked up a double outlet fixture with 12 gauge wires (15amp max it says) at Wal-Mart for about $7.50 with tax. They also sell one that has a single 12v outlet and a USB port or two, but I have plug in USB chargers already so I opted for the double outlet one. The USB one costs a few dollars more anyway.

I got a 12 gauge wire fuse holder from O'Reilly Auto, a package of 1/2" flexible sheath from Harbor Freight and used some good 10 gauge wire I had left over from the solar panel installation. It's on a shared circuit with a single 12V outlet up front that I currently use for a plug-in 3-outlet bar.

The reason I ran the cable far down the way I did is there is space inside the wall around the bathroom sink to drill a hole in the wall without damaging the fiberglass wall inside the bathrooom. Some 1/2" nylon holders with washers work nicely to hold the flexible wire tubing to the wall. I used the existing screws that hold the trim to the wall.

It's not the fanciest setup but I like it fine. It cost about $15 in parts plus the wire I already had.


Monday, September 2, 2013

Avoid Wal-Mart batteries if possible

I was packed up and was ready to leave the KOA and once again, I had battery problems despite slow charging it a few days ago. It had symptoms in the past but I thought it was due to poor charging maintenance on my part. So, I dragged my cords back out and got it going with my engine starter. I drove the mile or so down to Wal-Mart since it was a MAXX battery from them. The initial test they do inside showed it was fine. She called in the manager and he took out to the proper machine for testing. It came back bad. It was less than 3 years old and was a 3 year free replacement battery.  The manufacture date was 3/2011.

However, it was a replacement already for one that was bad within the original's 3 year waranty. So not only did the ORIGINAL battery someone bought go bad within 3 years, so did the second. They will only replace it free once, apparently.

So yes, Wal-Mart's 3 year free replacement batteries only last 2 years and you only get ONE free replacement, the first one. But that gets you through 4 years, roughly.

But then I opened my big mouth and said it was in there when I got it which means any and all warranty is null and void, even if the battery was bought brand new yesterday and I bought the van today.

I had to shell out $107 for a new battery. I needed it right then and they're cheaper than anyone else anyway and I will be able to get at least ONE free replacement if/when this one goes bad in a year or two.

Saturday, August 31, 2013

Dead house battery

Thankfully no harm was done, but my very old Diehard marine battery went bad. It was at the stage it could have exploded though!

About a week ago, my CO detector woke me up about 9am for no apparent reason. I thought perhaps the batteries in the detector were getting low or the detector is just aged and needs replacing.

Later on that day, I saw my battery voltage reading was unusually low so I plugged in my RV converter. I should have realized something was wrong at that point. Normally I have it unplugged since my solar panels keep the house battery bank charged. At 4pm, I shouldn't be showing 12.3V. I should be showing 14V from the solar charging!

I exited the van for about 10 minutes and returned to find 'rotten egg' smell, but not from any of the propane burning appliaces or from the propane tank storage compartment! It was coming from the battery box! The box is vented to outside but not airtight from the interior. I opened the box and the odor was strong and the old battery was burning hot.

I quickly unplugged the RV converter and disconnected my solar panels. After allowing it to cool down about 5-10 minutes, I promptly removed the bad battery and placed it outside. Thankfully, I caught it in time before it exploded. I was a bundle of nerves disconnecting it and hauling it outside.

I am holding on to it for core exchange since I will be getting another cheap marine battery next week. In the long run, such batteries are a waste of money but in the short term, it's 1/3 the cost of a pair of 6V Trojan T-105s, or rougly 1/2 the cost of a pair of cheap golf cart batteries. Plus I would have to modify the battery box I already built. I used scrap wood so I was limited in the size I could build it, so it ended up too short for 6V golf cart batteries.

It has crossed my mind to pull the old, worn out generator and install 6V golf cart batteries in it's place, but I'm not going to right now. I may do that in a year or two, if I decide I need more battery power. I would probably need a third 100W solar panel to keep up with the battery bank. I did install my first two in such a way that I have room for a third by removing the RV antenna so it's possible to do. Just not something I want to do right now. It would cost roughly $500 to add a pair of Trojan T-105's and a third solar panel so I may budget for that later on.

Saturday, June 8, 2013

Solar panels - Part 1

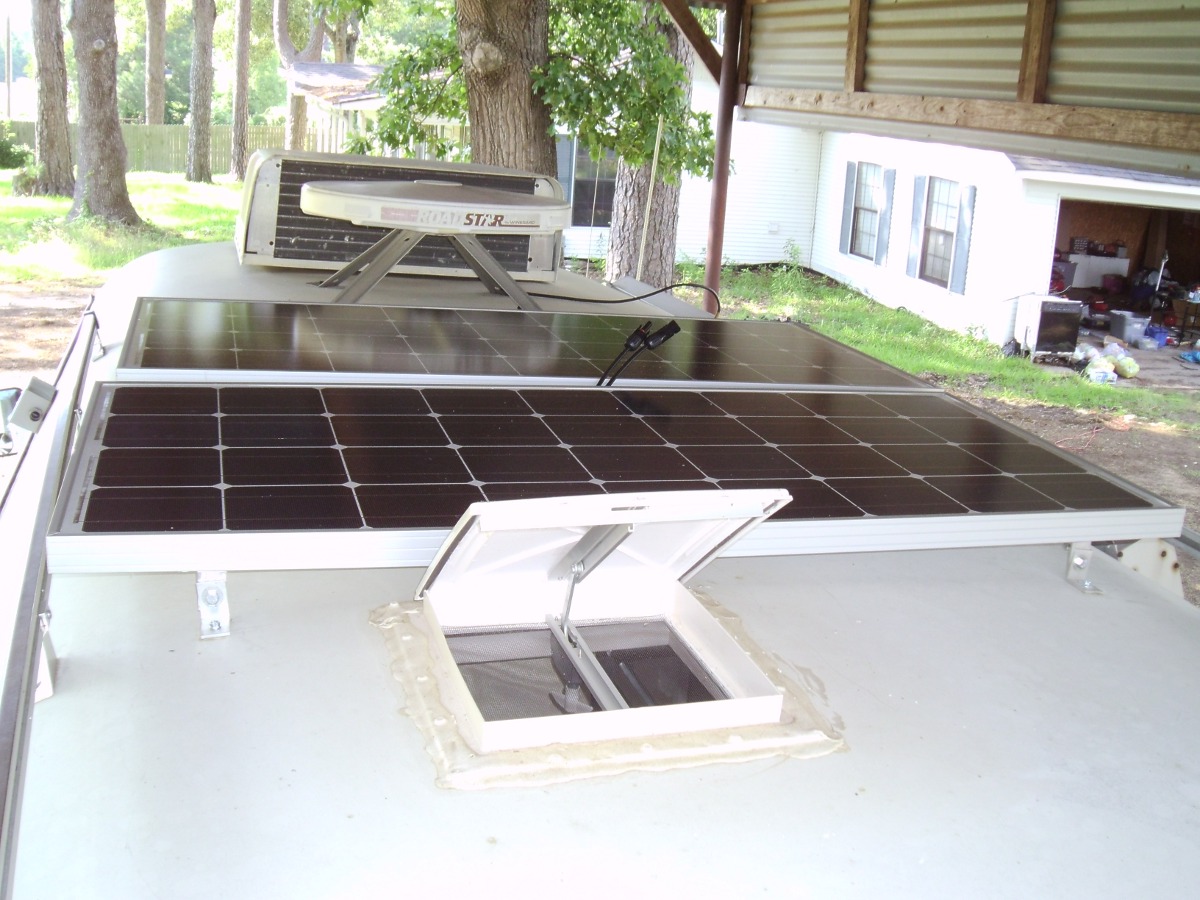
I have got my new two 100W Renogy solar panels installed to the roof. I am waiting on some MC4 wire connectors for making some custom cabling between the panels and controller. I have the wiring run part way, but no photos of that yet. Once the MC4 connectors come in, I can wire them up and I'll be all set. I am putting in-line fuses on both panels and between the charge controller and batteries so it'll all be well protected and I will be able to pull fuses to disconnect power if I need to work on the system in any way.

I had to offset them slightly so they aren't uniform. I realized that the rear one (installed second) was going to slightly interfere with the roof vent so I had to move it over a bit. It's not that noticeable and won't effect the usage of the panels. I'm not that OCD that they had to be perfectly lined up.

I used 3M 9468 VHB between the brackets and roof for a bit of adhesion of the brackets to the roof then put in a single sheet metal screw into a predrilled hole in the roof. They appear to be mounted plenty sturdy. I am tempted to add a tether to the sides at the decorative luggage rack for extra safety should one of the brackets break loose from the roof somehow. But since they are mounted low and should be pretty aerodynamic, I don't think there will be a problem. I have to seal around the brackets with some self leveling RV caulking next week after I get some.

I have room for expansion, for at least one 50W panel. If I were to remove the TV antenna, I could add another 100W as well but I think 200W to start with is plenty.

Monday, May 20, 2013

Starter relay

I loaded up the van to go shopping and do some other stuff today.. got in and it wouldn't start. The darned relay went bad. It took it almost 35 years to go out.. but yeah. The ground terminal broke off trying to remove it. I opened it up to see what was shaking around inside. It was rust particles!

$17 later, it's fixed. I doubt the new one will last 35 years.. but it's supposed to have a 'lifetime' warranty with O'Reillys. Stupid thing didn't even come with the nuts! I had to use the old ones.


Friday, May 10, 2013

30A hookup modification

The original design of the 30A electrical hookup left something to be desired. It had a hard wired 25ft(?) cable that had to be pulled out through the floor of the storage compartment. This made for a hard time trying to handle the cord when hooking and unhooking from power.

My solution is as follows. I cut the cable so that enough was left between the male 30A plug and the end so that it could be hard wired into the gang box. I used a ratcheting tubing cutter and it worked awesome on the very thick cable, giving a very clean cut. It's now just long enough to plug into the generator's outlet right next to it. I removed the original cable out of the gang box and fed in the "new" shorter cable and wired it up.

Using a female end extension cable, it can be plugged into the short mail pigtail I created without having to wrangle the entire length of a 25ft cable through the hole in the compartment floor as was the design.

An advantage to this is I can now get a non-hard wired surge protector and plug it in between the 30A extension cord and the short cable that is hard wired to the van, and it'll be protected from the elements, and out of sight from thieves.

I went on Amazon and bought an Arcon 18206 30-Amp Replacement Generator Power Receptacle and a Camco 55245 RV 30 AMP PowerGrip Replacement Plug so I can reuse the original cable.

It's comes out considerably cheaper than buying the special lock box for the surge protectors ($40) and a 25ft prefrab 30A extension cable ($55+) and makes everything easier, so I am happy with the mod.


Outside electrical outfit repair

The plastic (or is it particle board?!) gang boxes on the Xplorers tend to dry rot over the years, especially the outside one. A past owner attempted to "fix" it with a larger screw which only broke the box more. The box itself is pop riveted in and there's no way to get at it from behind, short of tearing into the wall from behind the sink!

I went down the road to a garage sale that is usually open every weekend and got a package of adapter plates meant for sheetrock and low voltage installation, such as phone lines. However, the way I have installed it, it is perfectly safe. You do need to drill through the adapter plate and into the body of the van so you can drive in sheet metal screws to hold the plate on. The plate has threaded holes that accepts standard outlet screws, so it repairs the outlet mounting situation that happens from the gang box threaded holes breaking.

I need to go back and replace the two wood screws I put in since I didn't have anymore sheet metal screws to fit. Also, I am going to replace the outlet itself and put in a new foam gasket, or two, if I can't find a single one that is extra thick like the original. I am also going to put a bit of silicone caulking around the edge of the adapter plate for extra protection against water seeping inside since it sits back from the body of the van a little due to the rivets holding the box in.


A: Damaged gang box
B: Holes drilled and sheet metal screws driven in
C: Threaded holes for standard electrical outlet screws


Needs caulking and new thick foam seal for outdoor outlets.


Reinstalled for demonstration purposes. A new outlet will be installed in the near future along with a new foam seal.


Old foam seal.


Caddy Fasteners Cat. No. MPLSBP adapter plates. I broke off the fold out mounting wings from the one I installed since they are not needed for this application.

Wednesday, November 14, 2012

Replaced light fixture

My van originally had a 12v dual fluorescent bar light over the sofa (which of course has been removed and a dinette put in it's place). It was no longer working, a replacement is expensive and they use more juice than LEDs, so I bought a new double light fixture on ebay and 6 more warm white 68 LED bulbs on ebay for all the interior light fixtures. I originally bought just one to test it.. and I loved it! I put two of them in the new fixture and it looks great.. puts out lots of light with very little power usage..The fixture can have one or both bulbs on depending on which mode you select on the switch.

Regular blueish LEDs hurt my eyes due to the color temperature. Warm white doesn't seem to strain my eyes the way the blue tint ones do. I had first bought a regular LED one with less on it and I don't like it. I'll keep it as an emergency spare or something.


Wiring & other repairs update

I was able to wire up the backup lights via the factory wire harness at the neutal safety switch and they work fine now. I also installed a new 97db backup alarm while I was at it. So now the van is nice and safe for lights.

I got the alignment done yesterday and had the mechanic look at the brakes. He said that they "scared" him how bad they were. You know your brakes are bad when they scare a mechanic when he test drives it. He bled off the brakes a bunch and they got better but they still aren't 100% right Perhaps 60% at best. I think i am going to have them replace the combination/proportioning valve and the master cylinder. Besides the brake booster, those are the only things LEFT that I haven't replaced on the brake system. Something has to fix it eventually!

Since the master cyl is cheap and they would have to bleed the brakes again anyway for the proportioning valve, I may as well just have them do it too just in case this master cylinder is bad. If those 2 things dont fix it.. I might get another booster and try it to see if it fixes it. By then, every single part of the brake system will have been replaced except for most of the steel lines and the front brake rotors.

I pulled the steering wheel today (thank god for no airbag to deal with) and sure enough, the turn signal cam for right turns is worn out. It's too weak to stay clicked. Simple $12 part with 2 wires to splice in so I will get that done in the next day or two once I go get the part.

Original turn signal cam removed:

Current proportioning valve:

Saturday, November 3, 2012

Rewiring running lights, part 2 - More problems.. elsewhere!

Man... just when I thought I was done with major electrical work.

I went and got 5 gallons of gas today and put it in the van and got it cranked up. (Which reminds me, I need to check my new hose connections for leaks now that fuel is in the lines.)

Low and behold... I stick it in reverse to make sure the backup lights are working.. and they weren't. And what's this?! The blinkers stopped working! ..Flashers work, but not blinkers. I look at the fuse panel and find #2 fuse is blown. (#6 was blowing for the running lights).

So after hours and hours of screwing around trying to get it to stop blowing fuses with no luck.. I figured out that it seems to only blow the fuse if left in reverse for more than a few seconds. In park, neutral, drive... it can be left in them and the fuse doesn't blow. If you hurry past reverse (in either direction), the fuse doesn't blow. But as soon as you leave it there... it blows the fuse.

An oddity about the van is that the horn only works when the engine is running which is NOT normal. The little bit of paper work I got with the van shows it failed a TX state inspection for a non-working horn. It's not really a big deal that the horn doesn't work when the engine is off.. but I may venture into fixing that as well since it's just a matter of routing the wire to a constant connection instead of a switched connection.

This may be a clue to why the fuse blows only in reverse since the horn is on the same circuit as the turn signals and presumably the backup lights as well.

I'm looking into if the backup lights are supposed to be wired directly to the neutral safety switch, which is what it appears to show in the Haynes manual schematic. If they are, it's a matter of running one new wire from the harness to the backup lights... like how I did to restore the running lights to working condition on the factory headlight switch.

In the meantime.. I bought some auto-reset circuit breakers that can used in place of glass fuses/ I ordered 3 sizes/2 kinds: Bussmann 10A & 15A & Dorman 20A. The Bussmann ones may not fit into the Dodge fuse panel.. but I may have a use for them in the motorhome's "house" fuse panel. The Dorman one will fit for sure but i wanted to try a smaller amperage rating one if possible so it and the wires don't heat up as much before the breaker trips. The factory fuse for #2 is 20A so the Dorman should be safe to use if the Bussmann ones don't fit.

This will allow me to go into reverse as needed and let the circuit breaker trip as needed instead of blowing a fuse. If I have to replace a fuse every time the van is put into reverse... that can get costly fast!. Never mind the fact that I'd also have to remember to stop and change thee fuse before I even drive forward any since the blinkers and horn would no longer work with due to the blown fuse. At least with an auto reset circuit breaker... it will resume working after it cools down again. It's by no means a proper fix.. but it will get me by without burning up the wiring or replacing endless fuses.

If using the factory wire harness with a new piece of wire to the backup lights doesn't work, I guess I will wire a special switch for turning on backup lights and the backup alarm. The alarm will at least remind me to turn it back off again but that's also annoying and borderline unsafe.

Sorry, no pictures today. Nothing worth seeing anyway.

Friday, November 2, 2012

Rewiring running lights, part 1

When I bought the van, fuse #6 was blown and had randomly blown a couple other times. I had no idea why... but I found out the other day.

The running lights (tail lights, front and side markers) were not working. The cluster's back lights had also gone out. I replaced the fuse, turned on the headlight switch and the fuse blew again. I traced it to the two runs of brown factory wire dedicated to the running light "hot" function. It took me over 2 days to figure out how to go about fixing the problem without screwing up the headlights, brake lights and turn signals since they were all working. Last night, I was able to do so.

Today I went to O'Reilly and bought 40ft of 14 gauge wire (two 20ft rolls) and some connectors.. which I won't be using. I tried to use one crimp connector and it didn't hold so that package I'll have to keep. The other package I will probably just return. I may need more wire in fact... but I may get by with some scrap wire I have laying around of the same gauge but of another color.

I also bought a new 97db backup alarm which I will be installing after I wire up the tail/side lights. There was a cheap 1156 bulb type backup alarm that was broken on the bulb holder so I tossed it in the trash. It was barely audible anyway when it worked part of the time and sounded very weak.

When I got home I had just enough time to wire up the front and get it working. I will also be replacing and wiring up the lights on the running boards so I am providing a power lead to them, wired into the factory headlight switch.

I ran out of daylight to finish the wiring at the headlight switch harness but that won't take very long to do tomorrow.

Part 2 will be about wiring up the rear lights. I may also do a part 3 for the running board lights.


Tuesday, October 9, 2012

Battery box

I built the wooden battery box today. It needs some minor fixes here and there but overall it's done. I used a piece of 1-1/2" PVC pipe screwed in and caulked around for the vent. The floor vent is going to end up half way covered up so I will see about adding some hose vents down through the floor where the bathroom shower & sink drain goes through. It will house two group 27 batteries with plenty of elbow room so getting them in and out will be easy. There is a lid (not pictured) that will be screwed down to seal it up.

I also changed two wires to a heavier gauge from the batteries to the 30A breaker and from the breaker to the fuse panel. The short red wire is actually smaller now for the larger black wire on the same terminal of the breaker so I will go back and change it. It's meant to feed everything 12V from the batteries, so it needs to be heavier gauge than 12. I think the larger black wire on the same terminal is 10g. It's some old wire I had laying around from when I had an extra battery hookup in the Ford conversion van I once had.

The 30A breaker may also be wired up backwards.. I gotta try to figure out what that wire is coming from the other side of the breaker is, It's pretty small gauge and seems to be spliced in or has something spliced to it. I haven't examined it closely enough to see yet.


Tuesday, April 10, 2012

The generator lives!!

After much fussing around with the fuel pump trying to figure out the inlets/outlets.. they were marked on the fuel pump where I couldn't see until I pulled it off of the generator. I also filled up the oil which was badly low first.

It took MUCH cranking to get the fuel flowing.. it fired right up with the old spark plug and air filter!

That's one thing I can check off my list of to-do's, as far as seeing it runs anyway. Now to get a new spark plug and air filter for it. Also need to check the output volage before I plug the RV's cord into it's generator's power outlet.