Showing posts with label Exterior. Show all posts

Thursday, June 1, 2017

Better camper shell! ..and too much procrastination

Ugh. I honestly don't mean to be so lazy about posting... really! The problem largely lies in the Blogger app being broken, at least on my phone. It crashes when I try to do anything, pretty much. The website is an option, but it's only the desktop site so it's a pain to use on a 6" phone screen. So I dread it and don't do it. I guess I need to try it on my tablet instead. But it's still a pain since I have to transfer photos... blah.

As of writing this, I'm in Dumas, TX with a free 24 hour RV site with electricity. I had electric and good cell service (for hotspot on my laptop, like I'm doing now) in Borger, TX but it was rather warm (mid to upper 80s) and I somehow didn't feel like dragging out my laptop and posting.

The biggest news is that I bought an RV-style camper shell for $100!! I had to just give away the old fiberglass one to the guy I bought it from, but considering he and his family helped get it put on the truck, and ran to the hardware store for me to get me longer bolts when I realized I didn't have any to mount it, I can't fuss. This one is insulated so it's leaps and bounds better. Plus it's at least a foot taller taller, several inches wider, and not sloped on the sides. This equals a lot more head and elbow room. Plus it has two cabinets that I mostly use for dry food storage.

 
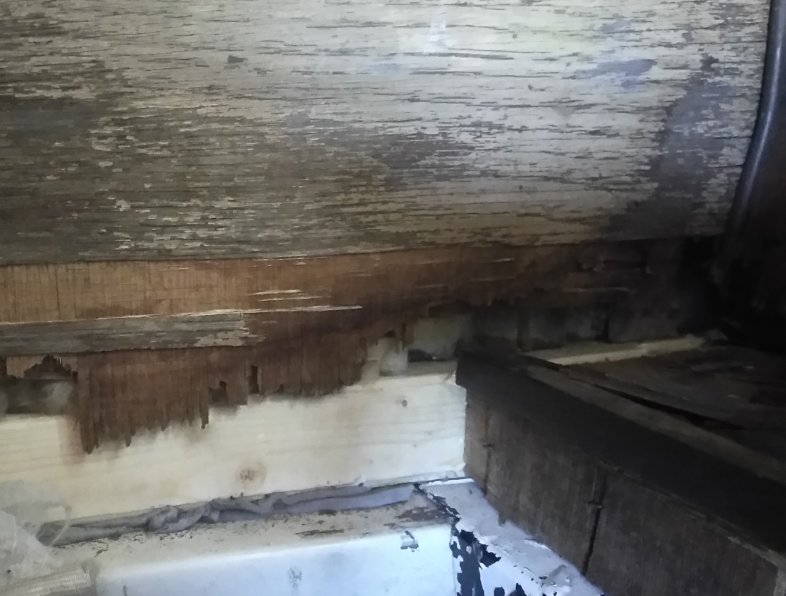
It's in slightly rough shape inside from poor storage (on grassy ground) so the wood got rotten. I replaced the worst of it that made it seem unstable, which cost me all of $5. I just peeled back the corner skin and slowly hammered it into place.


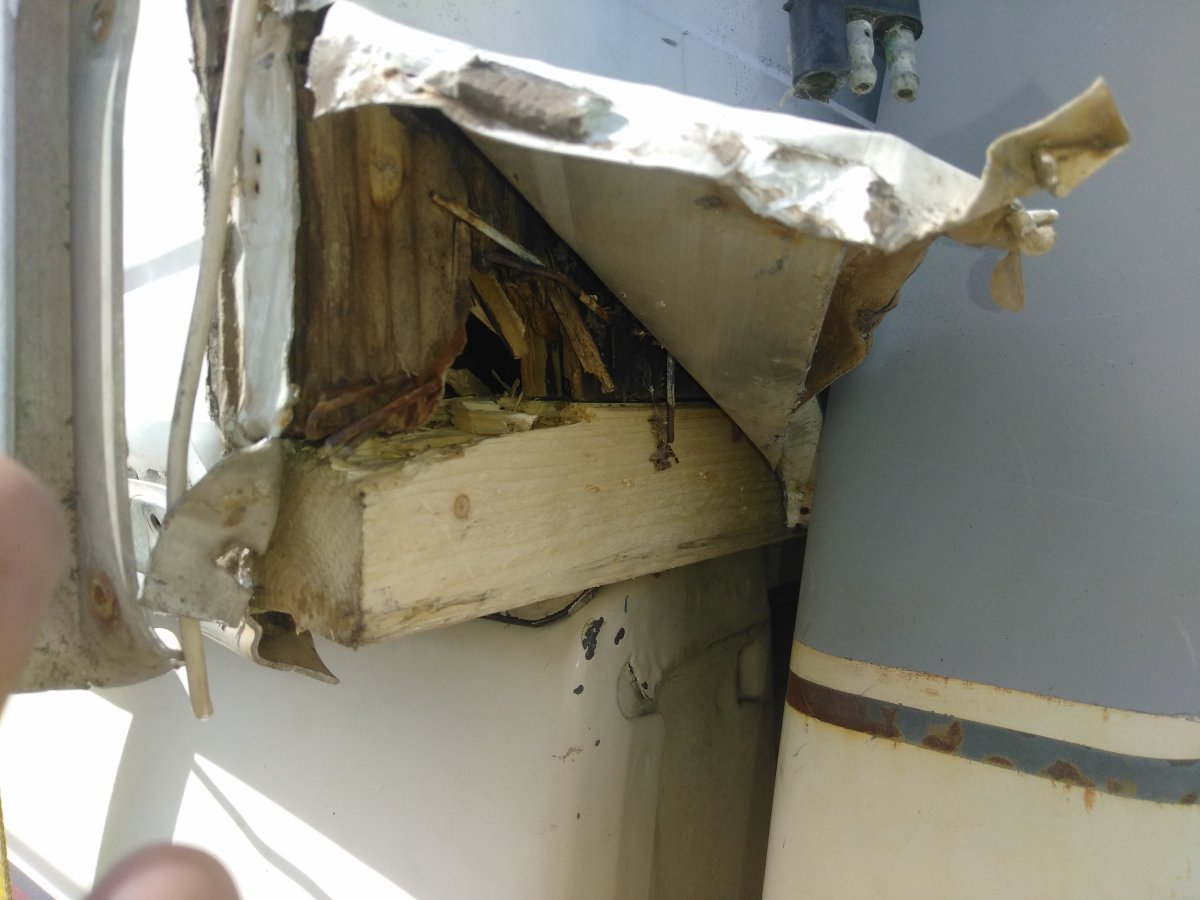
Then I screwed it into place. It's rock solid now. I couldn't put the skin back as well as I want because of it being right against the cab. I'd need a few people to help me move it away and put it up on a board to give me access to it properly. It might rot again sooner than it should, but it's not hard to change nor does it cost much, so it's fine for now.

This is an inside corner view before and after:


It could stand to have new paneling, which I might do eventually, perhaps only in part. I don't require a fancy living space, after all. The roof vent also needs full replacing. I will be getting one ASAP. In the meantime, I bought the domed vent cover to help prevent/minimize rain coming in. I also replaced the door knob with a "mobile home" one which included a foam gasket for the outside.


Inside view when almost dark outside, with a 120V LED light ($20 from WM) that lights up the place very well. I could probably run it on a tiny inverter without it being too much of a strain on the battery, but I fixed the original dome light so it's coming off of  the house battery too. The inverter's inefficiency loss would probably be more than the LEDs itself. And yes, it's warm white, so it's gentle on the eyes!


While in Dumas, my vacuum pump finally died pretty much. It has almost no vacuum, leaving me with very little power braking. I knew it needed one before I left Texarkana, but I had hoped it would last 6 months more as it was functioning. I had to pay retail ($130) for the pump vs about $80 online. I also had to buy a special pulley puller kit #39000 from Napa for $75 (also sold under the Lisle name, same number) because the cheap and "free rental" ones won't fit the pulley. But, $75 is cheaper than paying a mechanic. Plus it's so easy, I changed the pulley right there on the counter at Napa. Plus I have a physical item to use again or sell later, not so much paying labor. Plus, just buying a replacement pulley at retail price is about $55... and I'd still need a tool to install it with. So it was worth the unexpected extra cost.


I guess that's all for now. I swear, I'll ry to post more soon. I have some interesting stuff to post from the past few weeks, so I'll try to get to that soon. This post took so long, I need to get out and stretch my legs now.

Sunday, September 29, 2013

TV Antenna Removed

I am still having leaking problems around the roof vent. However, it may not be coming from the roof vent itself. I wish I had looked at it closer before I put the cover over it. I may have to pull it back off and check.

In any case, the TV antenna was suspect for causing leakage, either at the roof vent clear in the rear (water travels a lot more than you think!) or at a cabinet up front on the passenger side, so I took it off. I doubt I'd ever use it anyway. The water at the roof vent is coming from the insulation sandwiched between the fiberglass inside and outside. It's impossible to say where it's coming from. I'll have to just try everything I can think of.

I also tightened down the roof A/C's nuts since they were slightly loose. I had been noticing the A/C rattle more than it used to when the compressor kicked on and off. Now it doesn't. That may have also been a source of the leaking around the roof vent.


Thursday, September 26, 2013

Roof vent cover

We had heavy rain last which informed me of the new roof vent installed last year leaks badly around the seal where it closes. I also have bad leaking by one window at the rear bed, so I think i will have to fill in the gutter with caulk like I did on the other side that used to leak badly. It still leaks a little but not nearly like it did.

Anyhow back to the roof vent - Basically, the foam seal they use on the 9x9 roof vent absorbs the water that splashes against it when it's closed and partly compressed. The water then manages to work it's way inside through the seal, causing drips inside the roof vent. If they had used a rubber seal instead of foam, it might not have this problem.

I had reservations about having to install a 14x14 roof vent over a 9x9 vent but that was cheaper, easier and less risky than having to cut a 14x14 hole and install a 14x14 vent into it. I had to drill into the roof to install it, but I used butyl tape and Dicor self leveling caulk to seal over/around the holes so hopefully that'll do the trick. The edges are raised up due to the butyl tape around the screws holding it down, so excess water that gets inside somehow can drain out with ease.

In a way, I had been wanting a cover over it but I wasn't going to put one if I could help it. But I couldn't. So now I have one and I like it fine. I know this will stop the leaking since I had to throw an empty plastic tote over the roof vent at 4am when it was raining badly and water was dripping in. The box used as a cover stopped the leaking. So a roof vent cover will do the same.


Saturday, August 31, 2013

Updated photo - Before & after

Here is before and after photos of the curb side of my van. First picture is before I bought it. Second one was taken a day or two ago.

In the new photo, it has an exterior windshield cover to help keep the 100+ heat out and it works pretty well. It's theft resistant since the edges at the ends go over the doors, so you have to open the doors, or cut it up, to get it off.

After this summer, I won't be staying in 100+ heat if I can help it though. But even so, it's good for added privacy when at RV parks and campgrounds.


Monday, June 17, 2013

Tailpipe fix

Due to extending the sewer drains further out and having the tailpipe slightly at an angle, it ended up melting the new grey water cap and bayonet fitting I just installed. A muffler shop installed a new tip that extends it out a bit past the drain pipes. Cost? $30! Heck I figured the tip was going to cost that much!

Once that was done, I went back and replaced the drain outlet and cap with new ones. After about 150 miles of driving since the new drain was put on, no melting. :)

Saturday, June 8, 2013

Solar panels - Part 1

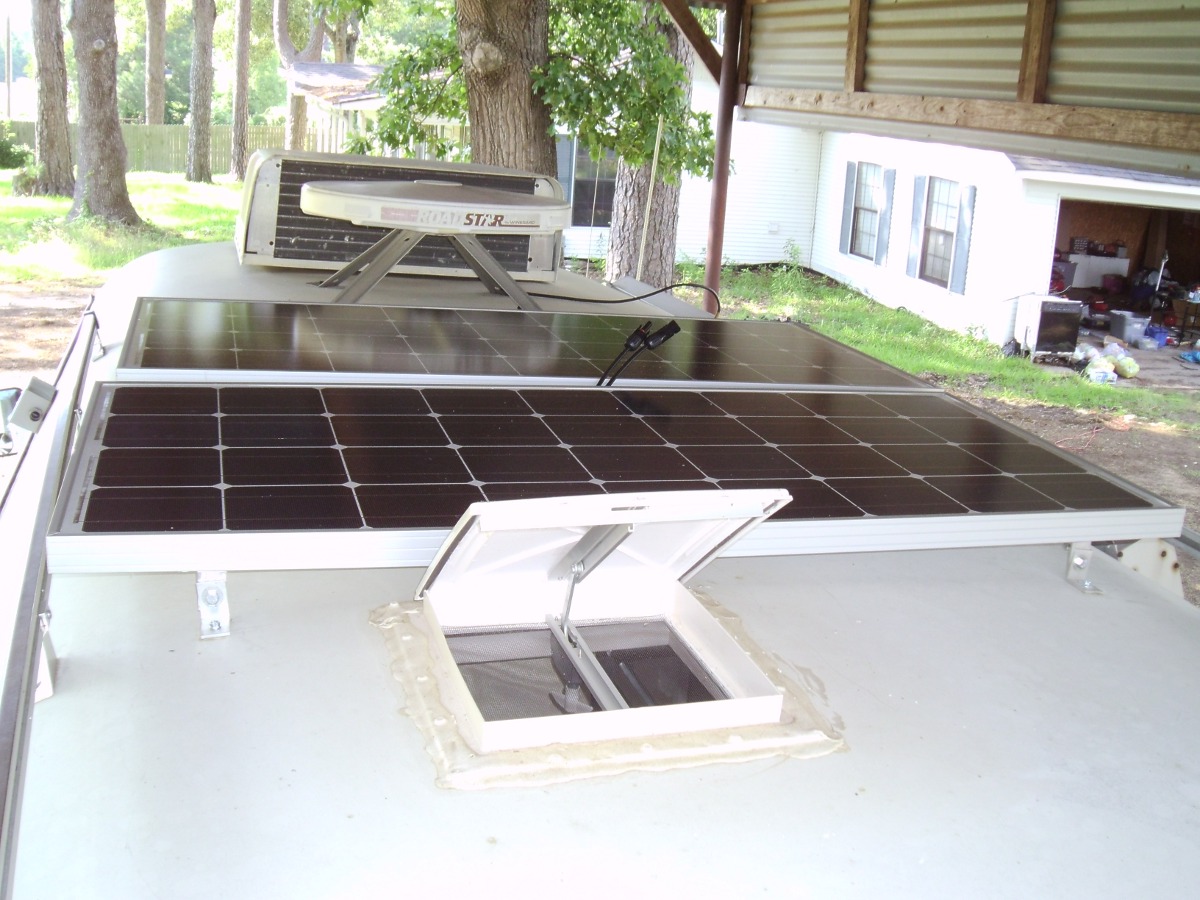
I have got my new two 100W Renogy solar panels installed to the roof. I am waiting on some MC4 wire connectors for making some custom cabling between the panels and controller. I have the wiring run part way, but no photos of that yet. Once the MC4 connectors come in, I can wire them up and I'll be all set. I am putting in-line fuses on both panels and between the charge controller and batteries so it'll all be well protected and I will be able to pull fuses to disconnect power if I need to work on the system in any way.

I had to offset them slightly so they aren't uniform. I realized that the rear one (installed second) was going to slightly interfere with the roof vent so I had to move it over a bit. It's not that noticeable and won't effect the usage of the panels. I'm not that OCD that they had to be perfectly lined up.

I used 3M 9468 VHB between the brackets and roof for a bit of adhesion of the brackets to the roof then put in a single sheet metal screw into a predrilled hole in the roof. They appear to be mounted plenty sturdy. I am tempted to add a tether to the sides at the decorative luggage rack for extra safety should one of the brackets break loose from the roof somehow. But since they are mounted low and should be pretty aerodynamic, I don't think there will be a problem. I have to seal around the brackets with some self leveling RV caulking next week after I get some.

I have room for expansion, for at least one 50W panel. If I were to remove the TV antenna, I could add another 100W as well but I think 200W to start with is plenty.

Friday, May 10, 2013

30A hookup modification

The original design of the 30A electrical hookup left something to be desired. It had a hard wired 25ft(?) cable that had to be pulled out through the floor of the storage compartment. This made for a hard time trying to handle the cord when hooking and unhooking from power.

My solution is as follows. I cut the cable so that enough was left between the male 30A plug and the end so that it could be hard wired into the gang box. I used a ratcheting tubing cutter and it worked awesome on the very thick cable, giving a very clean cut. It's now just long enough to plug into the generator's outlet right next to it. I removed the original cable out of the gang box and fed in the "new" shorter cable and wired it up.

Using a female end extension cable, it can be plugged into the short mail pigtail I created without having to wrangle the entire length of a 25ft cable through the hole in the compartment floor as was the design.

An advantage to this is I can now get a non-hard wired surge protector and plug it in between the 30A extension cord and the short cable that is hard wired to the van, and it'll be protected from the elements, and out of sight from thieves.

I went on Amazon and bought an Arcon 18206 30-Amp Replacement Generator Power Receptacle and a Camco 55245 RV 30 AMP PowerGrip Replacement Plug so I can reuse the original cable.

It's comes out considerably cheaper than buying the special lock box for the surge protectors ($40) and a 25ft prefrab 30A extension cable ($55+) and makes everything easier, so I am happy with the mod.


Outside electrical outfit repair

The plastic (or is it particle board?!) gang boxes on the Xplorers tend to dry rot over the years, especially the outside one. A past owner attempted to "fix" it with a larger screw which only broke the box more. The box itself is pop riveted in and there's no way to get at it from behind, short of tearing into the wall from behind the sink!

I went down the road to a garage sale that is usually open every weekend and got a package of adapter plates meant for sheetrock and low voltage installation, such as phone lines. However, the way I have installed it, it is perfectly safe. You do need to drill through the adapter plate and into the body of the van so you can drive in sheet metal screws to hold the plate on. The plate has threaded holes that accepts standard outlet screws, so it repairs the outlet mounting situation that happens from the gang box threaded holes breaking.

I need to go back and replace the two wood screws I put in since I didn't have anymore sheet metal screws to fit. Also, I am going to replace the outlet itself and put in a new foam gasket, or two, if I can't find a single one that is extra thick like the original. I am also going to put a bit of silicone caulking around the edge of the adapter plate for extra protection against water seeping inside since it sits back from the body of the van a little due to the rivets holding the box in.


A: Damaged gang box
B: Holes drilled and sheet metal screws driven in
C: Threaded holes for standard electrical outlet screws


Needs caulking and new thick foam seal for outdoor outlets.


Reinstalled for demonstration purposes. A new outlet will be installed in the near future along with a new foam seal.


Old foam seal.


Caddy Fasteners Cat. No. MPLSBP adapter plates. I broke off the fold out mounting wings from the one I installed since they are not needed for this application.

Wednesday, May 8, 2013

New holding tank installed!

I got the new holding tank installed! The only thing I need to keep an eye on is the mounts and the outlet pipe. Installation went pretty smoothly. I had to make several trips to Lowe's to get ABS pipe fittings and a 2ft piece of 3" ABS pipe. Plus one trip each to two different RV shops for the Valterra parts (fittings, drain valve, caps). Tank, parts and all... set me back about $325-350. Not too bad really since I saved about $250+ in labor doing it myself.

For your viewing pleasure.. lots of photos from start to finish.


I drove one side of the van up onto Lynx Levelers to raise it up high enough to get the tank under the running boards. Worked like a charm.


Fresh new tank! (upside down)


2-1/4" hole cut in the tank and grommet installed. The way I figured out how to cut the hole was I installed the tank and marked the opening area through the floor on the tank with a sharpie, then took it back off and marked it with the grommet for a perfect circle, then marked a spot in the center of the perfect circle, drilled a small hole in the dot, then used the hole saw. It worked perfectly! Then I cleaned up the cut with sandpaper and installed the grommet. It took using a heat gun lightly on the grommet (a hair dryer would have also worked) to soften it and make it pliable enough to get the last 1/5 down in the tank since it's pretty rigid rubber when it's cold.


Closer photo of the grommet. As per the instructions, I sealed around it with 100% Silicone sealant. Regular silicone caulking might also work but this stuff is a little thicker.


Tank installed (with pipe grommet and inlet pipe on top going up through the floor).


Pipe coming from the bathroom sink and going to the new rubber 90 degree elbow (Fernco PQL150) then down to the pipe going into the tank grommet. Yes, you do see PVC between the elbow and tank grommet but at that time, I didn't think I needed to buy any 1-1/2" ABS, but I did. By then, I already had the tank installed. In order to change it, I would have to drop the tank to get at the clamp on the grommet sealing the pipe. It doesn't matter since it has the rubber grommet on the tank and the rubber elbow up top. You may also notice the coupler along the ABS pipe before the rubber elbow. I cut it back too far so rather than using another rubber coupler, I put a regular cemented ABS coupler and short piece of pipe. This setup allows the tank to be removed easily in the future and is superior to the original pipe that had a short reinforced coupler between the tank inlet pipe and an ABS 90 degree elbow.


New tank drain/outlet parts partly assembled and laid out. All the ABS was already assembled, just waiting to be permanently installed at this point.


Due to the design, the combined drain pipe from the galley sink and shower drain must tie in through a tree after the tank but before the drain valve, so that's what you see here. Even with the drain valve close, the tanks will empty into the tank.. from the bottom. They are higher than the water level in the tank (unless it gets so full it overflows..) so gravity and vacuum will do it's thing and fill the tank.


All assembled and ready to go! I drilled a couple of holes and used some "plumbers tape" (metal strapping to suspend pipes and duct work) to help secure the long drain pipe (10.5 inches) so it doesn't bounce around and break something. It's not visible, but I also and put in a piece of wood between the running board and pipe end fitting so it can't move as much. It's held in place by a couple of screws that were run through the running board and then into the piece of wood.


The two drain outlets: Grey water tank on the left and recirculating toilet on the right.. with tail pipe in the middle. I may add a tail pipe extension tip to put it out a bit further so it doesn't expel the exhaust on the toilet drain pipe as badly.


Further away view of the two drain outlets.

Tuesday, January 15, 2013

Heater exhaust wind deflector

The van has an Empire T-10 model 10,000 BTU (input) / 7,000 BTU (output) furnace. About 10 months ago, I was able to get it working by blowing compressed air through it to clear out dirt or whatever it had in it that was causing the pilot not to stay lit when released (per lighting protocol). Too bad I already bought an extra, rare pilot thermocoupler for it. But at least I have a spare now since they are really scarce.

It must not have been windy at all that day, it worked beautifully. It turned on and off as it should automatically depending how the thermostat was set. I tested it for about 10 minutes then shut it off.

Today, it was around 32 out with light but semi-constant wind.. and it was blowing into the furnace and blowing out the flames completely. Even when the heater is actually on and running, not just the pilot.. so wasn't a pilot light issue. I watched through the little window as it was burning fine.. then being beaten with wind and then being blown out as the wind picked up. When I opened the window, I could feel a strong breeze blowing straight through the burner.

I saw a webpage talking about a wind deflector they bought for their water heater: WH Wind Guard

I looked around and found an old desktop PC's side cover from a PC I scrapped about a year ago.I bent it down the middle, drilled a hole, ran down to the hardware store and got about $5 worth of items and came up with what you see attached.

It's not something that can be left when driving but that's ok. The van's factory dash heater works for when I'm driving. With gloved hands it can be removed even when hot and tossed into my utility trailer, so the big bulky metal plate isn't something I have to worry about taking up valuable space. The plate has a hook on it and so does the grill on the van. So I only have to keep from losing the tensioner in the center. If I do, they're about $3 to replace. I may keep a spare in the glove box just in case, or even get a closed hook for the plate instead of an open one like it has now so the tensioner will be tethered to the plate.

The pilot/gas supply has an electrical-type thermocouple (generates power from heat or something, doesn't use 12V) and so it has 2 wires running from the pilot's thermocoupler to another component (gas supply switch) and I think it's getting a bad connection. I bumped one of the wires and it cut off instantly. I had to pull the wire connections off and put them back before the pilot would stay lit again. Then I had it working, I exited the van to get my camera for the following photos, took them,gotent back in the van and the flame was totally off, pilot too.

Thankfully it *does* stop the gas from blowing if the flames go out totally despite being in the "on" position. By the 70's they already had that kind of safety feature. I had to wiggle the wires again before I could get the pilot to stay lit. Then it stayed lit and the heater came on fine.

I think shutting the van door made the bad wire connection vibrate enough to disconnect before. It just uses 2 short wires with female blade connects on each end, so it's very easy to make new ones if the old ones are a bit worn out on the blame connectors. Sometimes you can squish them with pliers to fix them as well, then put them back on the blades.

 Anyhow.. now it's lit again and running and seems to be staying lit now despite repeated door closings.

I am testing how well it heats the van at around 32-33 degrees outside.

I set the thermostat to 5 and it heated the van up about 15 degrees in an hour. That's much faster than the electric heater did at 900w running constantly. The gas heater turned on and off at least once or twice in that time when it felt it was warm enough based on the thermostat setting.

Since then, I have bumped it up to 7 and I'll check back an hour later to see how warm it is. A heater set to 1500w would put out at best 5000 BTU or so.. which would be ok for the most part. The propane heater will be a supplemental heater when I have electric to plug in to.. or use exclusively when I'm stopping someplace without hookups.


Saturday, November 3, 2012

Rewiring running lights, part 2 - More problems.. elsewhere!

Man... just when I thought I was done with major electrical work.

I went and got 5 gallons of gas today and put it in the van and got it cranked up. (Which reminds me, I need to check my new hose connections for leaks now that fuel is in the lines.)

Low and behold... I stick it in reverse to make sure the backup lights are working.. and they weren't. And what's this?! The blinkers stopped working! ..Flashers work, but not blinkers. I look at the fuse panel and find #2 fuse is blown. (#6 was blowing for the running lights).

So after hours and hours of screwing around trying to get it to stop blowing fuses with no luck.. I figured out that it seems to only blow the fuse if left in reverse for more than a few seconds. In park, neutral, drive... it can be left in them and the fuse doesn't blow. If you hurry past reverse (in either direction), the fuse doesn't blow. But as soon as you leave it there... it blows the fuse.

An oddity about the van is that the horn only works when the engine is running which is NOT normal. The little bit of paper work I got with the van shows it failed a TX state inspection for a non-working horn. It's not really a big deal that the horn doesn't work when the engine is off.. but I may venture into fixing that as well since it's just a matter of routing the wire to a constant connection instead of a switched connection.

This may be a clue to why the fuse blows only in reverse since the horn is on the same circuit as the turn signals and presumably the backup lights as well.

I'm looking into if the backup lights are supposed to be wired directly to the neutral safety switch, which is what it appears to show in the Haynes manual schematic. If they are, it's a matter of running one new wire from the harness to the backup lights... like how I did to restore the running lights to working condition on the factory headlight switch.

In the meantime.. I bought some auto-reset circuit breakers that can used in place of glass fuses/ I ordered 3 sizes/2 kinds: Bussmann 10A & 15A & Dorman 20A. The Bussmann ones may not fit into the Dodge fuse panel.. but I may have a use for them in the motorhome's "house" fuse panel. The Dorman one will fit for sure but i wanted to try a smaller amperage rating one if possible so it and the wires don't heat up as much before the breaker trips. The factory fuse for #2 is 20A so the Dorman should be safe to use if the Bussmann ones don't fit.

This will allow me to go into reverse as needed and let the circuit breaker trip as needed instead of blowing a fuse. If I have to replace a fuse every time the van is put into reverse... that can get costly fast!. Never mind the fact that I'd also have to remember to stop and change thee fuse before I even drive forward any since the blinkers and horn would no longer work with due to the blown fuse. At least with an auto reset circuit breaker... it will resume working after it cools down again. It's by no means a proper fix.. but it will get me by without burning up the wiring or replacing endless fuses.

If using the factory wire harness with a new piece of wire to the backup lights doesn't work, I guess I will wire a special switch for turning on backup lights and the backup alarm. The alarm will at least remind me to turn it back off again but that's also annoying and borderline unsafe.

Sorry, no pictures today. Nothing worth seeing anyway.

Friday, November 2, 2012

Rewiring running lights, part 1

When I bought the van, fuse #6 was blown and had randomly blown a couple other times. I had no idea why... but I found out the other day.

The running lights (tail lights, front and side markers) were not working. The cluster's back lights had also gone out. I replaced the fuse, turned on the headlight switch and the fuse blew again. I traced it to the two runs of brown factory wire dedicated to the running light "hot" function. It took me over 2 days to figure out how to go about fixing the problem without screwing up the headlights, brake lights and turn signals since they were all working. Last night, I was able to do so.

Today I went to O'Reilly and bought 40ft of 14 gauge wire (two 20ft rolls) and some connectors.. which I won't be using. I tried to use one crimp connector and it didn't hold so that package I'll have to keep. The other package I will probably just return. I may need more wire in fact... but I may get by with some scrap wire I have laying around of the same gauge but of another color.

I also bought a new 97db backup alarm which I will be installing after I wire up the tail/side lights. There was a cheap 1156 bulb type backup alarm that was broken on the bulb holder so I tossed it in the trash. It was barely audible anyway when it worked part of the time and sounded very weak.

When I got home I had just enough time to wire up the front and get it working. I will also be replacing and wiring up the lights on the running boards so I am providing a power lead to them, wired into the factory headlight switch.

I ran out of daylight to finish the wiring at the headlight switch harness but that won't take very long to do tomorrow.

Part 2 will be about wiring up the rear lights. I may also do a part 3 for the running board lights.


Tuesday, October 23, 2012

Lower fridge vent

I built a replacement lower slide-in vent compartment door and used the generator compartment's old lock due to it's length. I put a new, shorter lock on the generator's door with a cam that made it work perfectly. The longer one wouldn't have worked for this fridge compartment door.

Not too shabby looking if I do say so myself! The vent piece is very light weight aluminum and has a screen behind it to help keep bugs out.

I also removed the frame and replaced the butyl tape and screws for it.


Saturday, October 20, 2012

Storage Compartment Painting

The rust in the left side storage compartment was REALLY bad. But it's still nice and sturdy. I grabbed a can of Rustoleum primer I already had (and should have used on the propane compartment but it wasn't nearly as bad) that says you can use it on rusted surfaces and gave it a good coating after I cleaned out all the loose bits of rusted metal.

I also had to make a new compartment door for it but it was easier. I used the existing frame parts from two old original compartment doors and built it last night in a hurry. I will likely go back and paint the wood with primer and white paint like I did on the other side except I didn't use primer on the other door first, and it took many paint coats as a result and took days to paint.

I also primed the underside of the compartment as it was pretty rusty too. I'll give it a coat of paint as well.

I got new compartment locks in the past few days and have them installed as well.